Last week, I shared with you the first in a series of international posts from my time traveling and teaching elementary foreign language in southeast Asia.
Here in Thailand, the average class size is about 25-40 students with either one or sometimes no assistant.
You know what that means: crowded classrooms and limited time (both for prep and execution).
I’m sure you can relate. The challenges teachers face with language instruction are universal.
Because of that, this week, I’m focusing on another simple yet incredibly effective solution that I demonstrated in one Bangkok classroom: learning stations!
Let’s start with the basics:
What are “learning stations” and how do you set them up?
A learning station is a small-group, student-centered approach to organizing both your classroom and your lessons.
Step 1
Start by identifying a single content area that you’ll use as a unifying theme to tie together each of stations.
Step 2
Next, break that single content area down into three to five different multisensory activities to engage diverse learning styles. For example, one station could have a card game, another an art project, and a third a writing assignment. For large classes, don’t be afraid to duplicate stations.
Step 3
Then identify the differentiated or scaffolded language goal for each activity. This doesn’t have to be part of each station from the word “Go.” Instead, just plan ahead and be ready to introduce higher levels as you walk around and your students become ready.
All of the lessons in the Sube Teacher Manuals (both English and Spanish) contain a wide variety of versions and supplemental activities that are ready made for exactly this kind of differentiation and scaffolding.
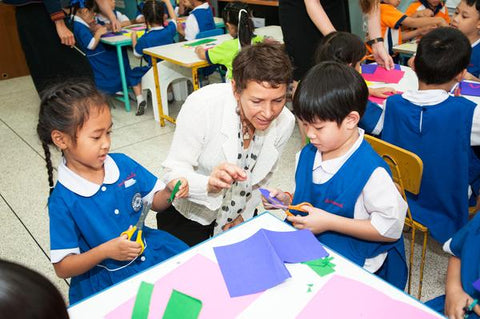
In this post, the pictures and video all feature the art project “Animal Collage” from Sube’s Beginner Kit. If you’d like the full instructions, just scroll to the bottom of this post and click the email link.
Step 4
After you’ve selected your activities, arrange the physical layout of your classroom. If it’s possible, you’ll want to setup your class’ desks or tables beforehand into small clusters designed to accommodate 3-5 students. Keep in mind the activity for each station and adjust the table space as needed.
Be sure to utilize your entire room. Setting up stations at desks, tables, or even on the floor, are great ways to create variety and keep your student physically engaged.
What really matters is breaking up the physical “feel” of out your classroom so that the groups become the geographical “centers” instead of you and front board.
Now that you’re set up, let’s talk about putting it into action.
First, how do learning stations help with
crowded classes?
As you can see from the pictures and especially video, learning stations don’t just make developing real world language skills possible in packed settings, they make it effective and engaging.
Of course, the key isn’t just geography (i.e., setting up your classroom in the small-group layout), but giving clear instructions at the start, briefly modeling each activity, and then roaming the class and being proactive as your students play and learn.
What’s really great is that learning stations not only facilitate more peer-to peer interactions and cooperative learning, they also free you up so you can go from group to group observing and providing individual guidance as needed.
Second, how do learning stations help with limited time?
Traditional, 20th century classrooms place teachers at the center: physically and educationally.
This makes you the “star of show” (so to speak), which of course, means more prep time, more work, and more effort trying to keep the show running (especially when you add in discipline issues and easily distracted students).
On top of engaging students in large classes, learning stations shift the focus from teacher-directed “lectures” to the students themselves.
Learning stations drastically reduce your in-class workload by making you responsible for guiding the groups and providing individualized attention.
The Animal Collage example at Prince Royal College took place in a 40 minute time frame. After walking them through the activity, the students were amazingly focused and naturally explored the project and the language. They even did a great job struggling on their own.
In the video you will see all stations doing the same in-depth collage project.
We quickly discovered that it would be more effective to have one or two stations with an in-depth art project that require more supervision, and the others with more simple activities that do not require much supervision. Rotating your class through these different projects allows you to spend that quality time with a smaller group of students at a time.
By placing the responsibility on your students shoulder (instead of yours) they more naturally take ownership for their learning. And when they take ownership for their learning, their learning takes off.
Oh, and if you’d like a copy of Animal Collage...
Just email me by clicking here (the subject “Animal Collage from the Blog” should automatically load). We’d be happy to send out the instructions and add you to our email list.
